

Since certifying the R66 Turbine helicopter in 2010, Robinson Helicopter Co. has been steadily expanding the aircraft’s capabilities and mission sets. It certified an R66 Police Helicopter in 2012, the R66 Turbine Marine with pop-out floats in 2014, and an electronic news gathering model last year. Along the way, it has also certified a range of avionics and equipment for the aircraft, including glass cockpits from Garmin and Aspen Avionics, and the Genesys HeliSAS stability augmentation system and autopilot.

At HAI Heli-Expo 2018 in Las Vegas, Nevada, earlier this year, Robinson showed off its latest upgrades for the R66: new touchscreen Garmin avionics and, for utility operators, a long-awaited cargo hook kit.
Robinson has been promising a cargo hook kit for quite some time now, but as company president Kurt Robinson explained, it kept getting sidelined by other projects. While an Onboard Systems cargo hook kit has been available for the R66 since 2015, the factory kit comes with a slightly higher weight limit and some premium features, notably provisions to enable solo flight from the left seat.
The company announced Federal Aviation Administration certification of the cargo hook kit on Aug. 20. In advance of certification, Kurt Robinson invited me to the factory in Torrance, California, to give it a try.
Flying the line
It had been over a decade since I had been to the Robinson factory as a certified flight instructor in training, getting ready to launch my career in helicopters by instructing in R22s. Not surprisingly, plenty had changed. Kurt Robinson gave me a tour of the now much larger factory floor, pointing out sophisticated new machines and procedures aimed at improving the quality and efficiency of manufacturing.
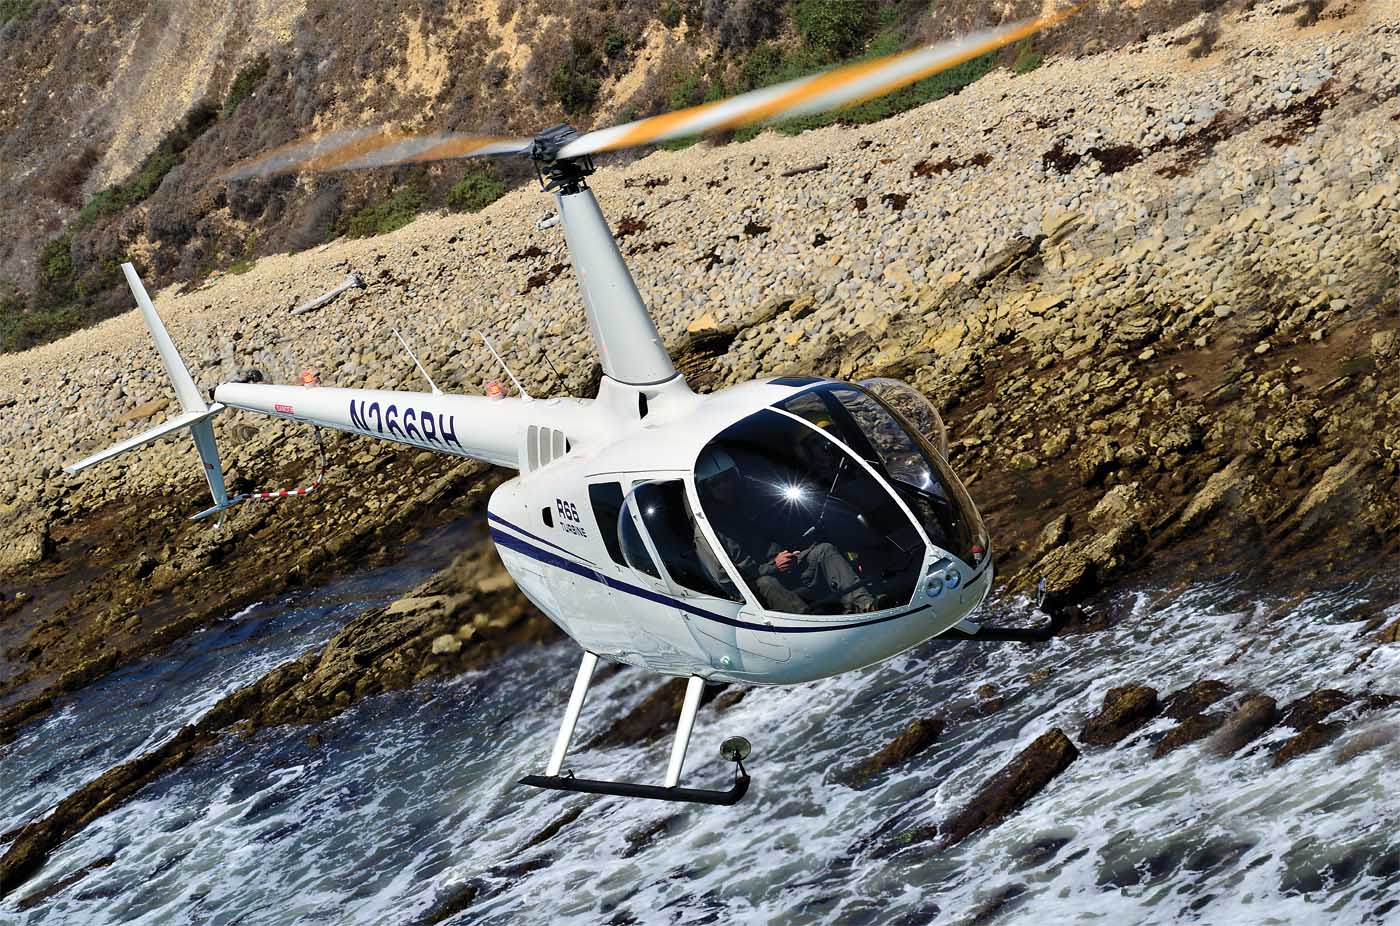
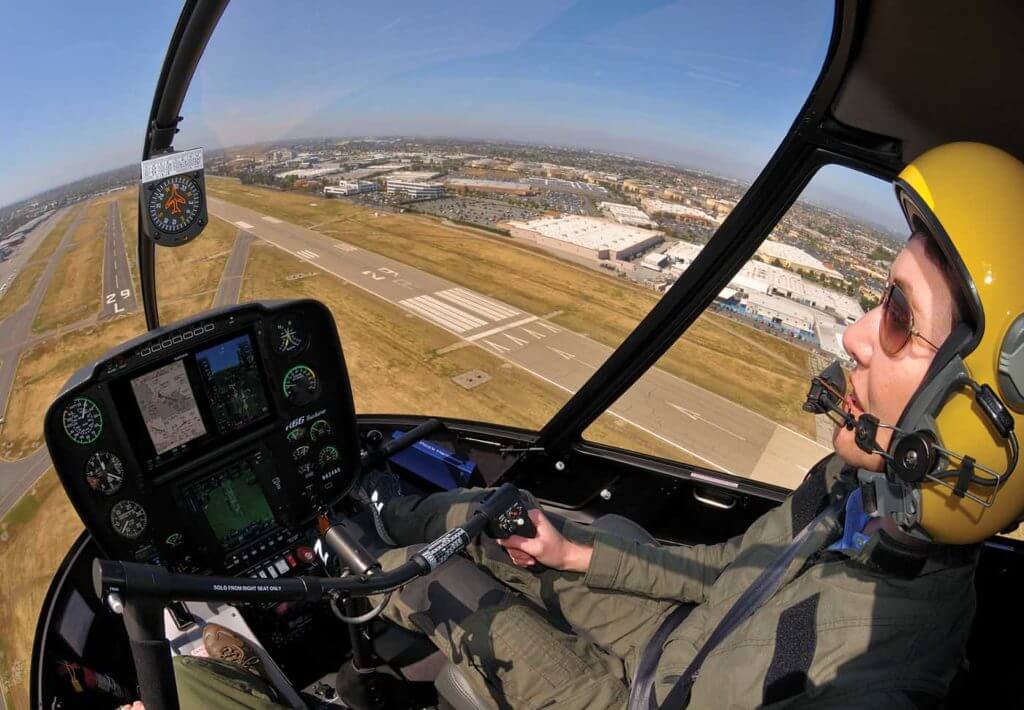
I had never flown the R66 before, although I had studied up on the flight manual in anticipation of my visit. To get me comfortable with the aircraft, Robinson chief test pilot Doug Tompkins talked me through a pre-flight, then took me up for a 1.5-hour familiarization flight in the local area. It didn’t take me long to appreciate why the R66 is such a popular option for private owners upgrading to turbine helicopters from R44s. In flying, primacy is everything, and as someone who logged her first thousand flight hours in Robbies, I felt right at home.
After warming up with some pick-ups and set-downs in Torrance, we departed west to the Pacific coast, where Tompkins had me enter a maximum performance climb at 60 knots, yielding a very sporty climb rate of over 2,000 feet per minute. We headed to the Long Beach Harbor to practice recovering from vortex ring state, then to the Compton/Woodley airport for some straight-in and 180-degree autos with power recoveries. (I was already a fan of the R44 for autorotations, but I think I liked the glide of the R66 even better.)
We wrapped things up in Torrance with some full-down autos — which were fun and easy with a 15-knot headwind — plus a hydraulics-off approach and some hovering autorotations. By the end of the flight, it was apparent to me that the R66 has the performance and smooth control to serve as a capable light utility helicopter, particularly for R44 operators looking for next-level performance, or legacy Bell JetRanger operators seeking an affordable modern replacement.

The day was still young, but the Torrance airport was mobbed with students from Robinson’s factory safety course, plus a variety of warbirds practicing low passes over the runways. Rather than fight the crowds, we postponed my cargo hook evaluation until early the next morning, when coastal fog meant we had the airport all to ourselves.
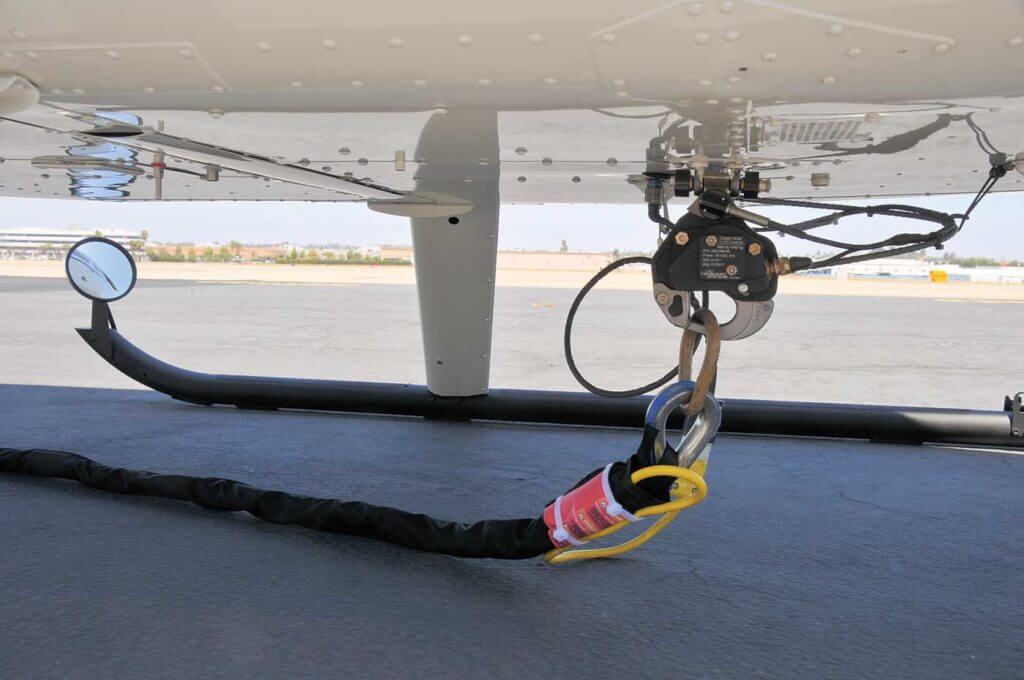
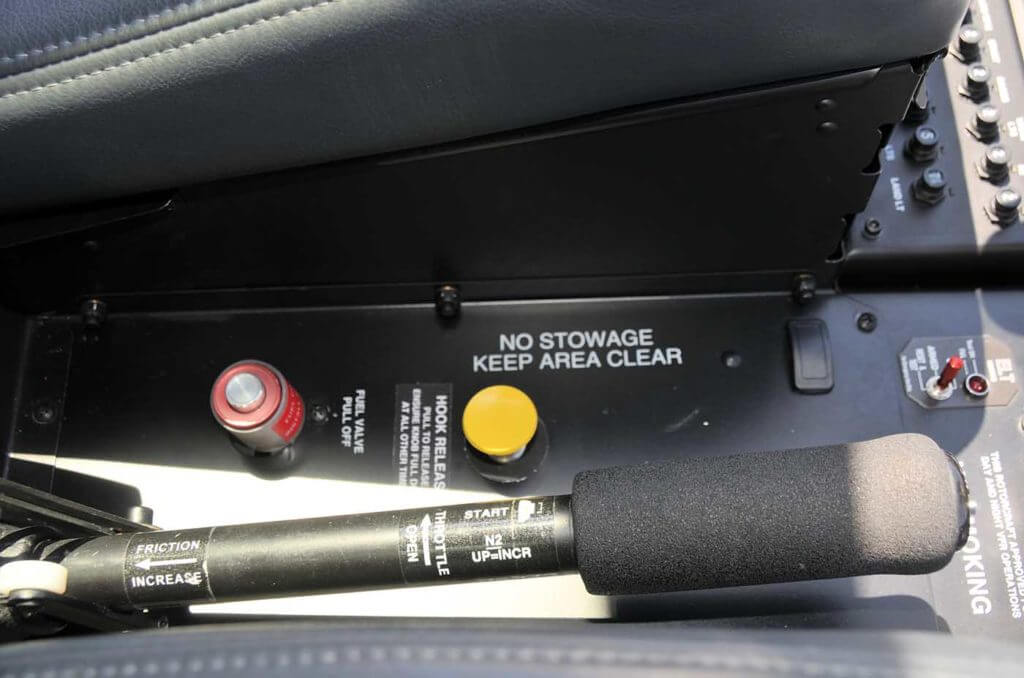
Robinson has clearly put a lot of thought and effort into designing its cargo hook kit. This is a product optimized for serious utility operators, not someone who has to sling a load once or twice a year. The kit includes an Onboard Systems cargo hook rated to a maximum load of 1,200 pounds (545 kilograms), which is a nice bump over the 1,015 lb. (460 kg) to which Onboard Systems’ own kit is certified. The Robinson kit includes electrical and mechanical releases for both pilots, as well as remote external control.
However, the real differentiators for the factory kit are the left-side pilot-in-command provisions. In the standard R66, solo flight is permitted from the right seat only, but the cargo hook kit includes an upgraded left-side cyclic with hydraulic and radio switches, plus a left-side start button, which together enable solo flight from the left seat.
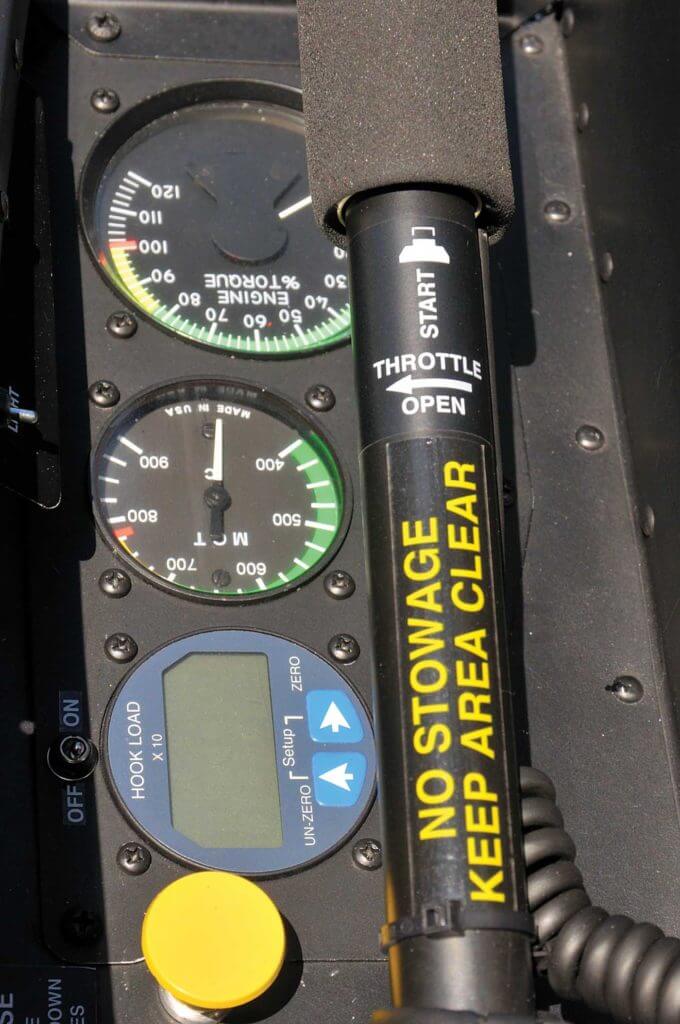
The enhancements don’t stop there. A panel at the left door sill contains supplemental engine torque and gas temperature gauges and a load cell display so that the pilot can track essential parameters during vertical reference work. This panel also includes an emergency manual hook release, in the form of a knob rather than a conventional T-handle (a similar manual release is located between the seats, accessible to the co-pilot).
The kit includes some additional smart touches, such as a fuel status light to indicate approximately 12 gallons of usable fuel remaining — a welcome reminder before the standard five-gallon low fuel caution light. There are also interior hard points at the forward door posts for attaching safety tethers or harnesses during doors-off operation.
The standard kit adds approximately 9.5 lb. (4.3 kg) to the R66 at a cost of US$28,000. Optional equipment includes forward doors with oversized bubble windows (12.5 lb./7.5 kg and $4,900 each) and six-inch-diameter cargo mirrors mounted at the front of the skid tubes (1 lb./0.45 kg and $340 each). The aircraft I flew was equipped with a left-side bubble door and cargo mirrors for both skids; we removed the right-side door for the demonstration.
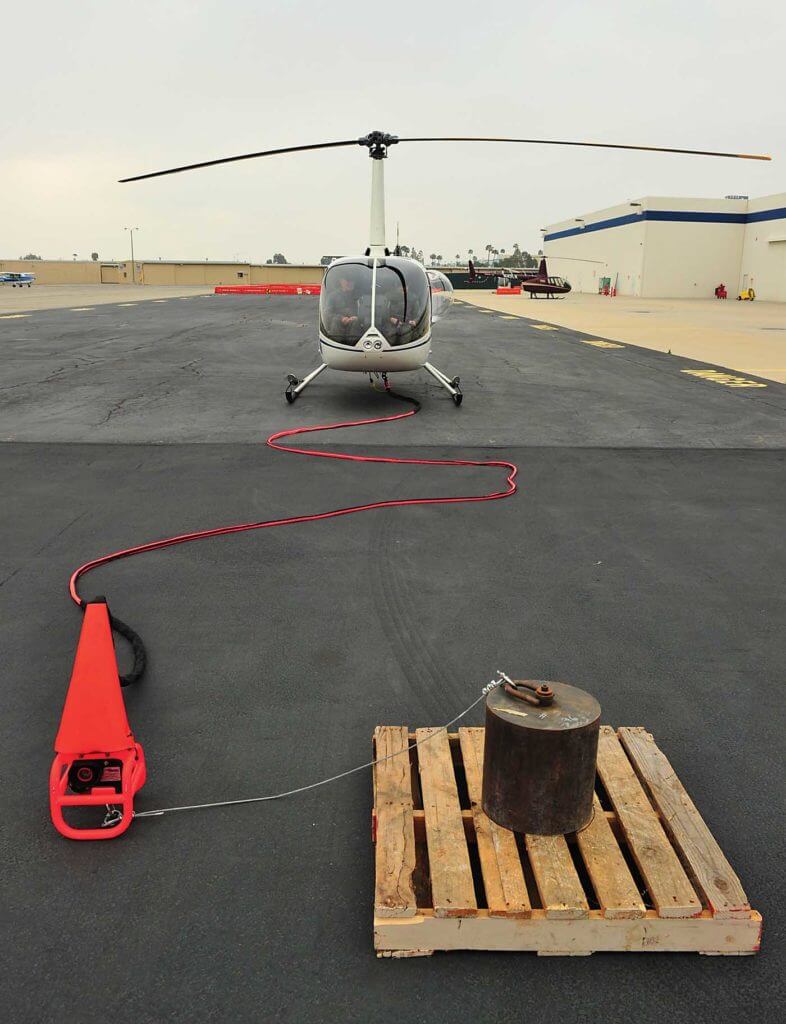
Even though we had the Torrance airport to ourselves that morning, we were fairly limited in what we could practice due to the surrounding built environment. Tompkins, in the right seat, lifted off the ramp with a 400-lb. (180-kg) load on a 50-foot (15-meter) line, then transitioned to the grassy field on the northwest side of the field. We weren’t able to do pattern work, but I was able to fly the load back and forth along the length of the runway, and practice some abbreviated approaches.
Visibility out the bubble window was terrific, and although I didn’t need it that morning, the window was also equipped with a small fan to keep it from fogging up. The sizing of the window is generous; even with a helmet on, I didn’t knock my head against the window once. The bubble windows limit never-exceed speed (Vne) to 100 knots indicated airspeed (Vne with a load on the hook is 80 knots). When we later did a photo shoot with both bubble doors but no line on the hook, the aircraft reached 100 knots easily, with no adverse vibrations.
During my cargo hook demonstration at sea level — with two pilots and around 50 gallons (190 liters) of fuel on board, plus the 400-lb. load — we were hovering at between 60 and 70 percent torque (maximum continuous torque is 83 percent). With the factory cargo hook kit installed, the maximum gross weight of the R66 will increase from a standard 2,700 lb. (1,225 kg) to 2,900 lb. (1,315 kg) with an external load.

Once I was satisfied with flying from the left side of the aircraft, we landed and Tompkins and I swapped seats. What a difference! From the right seat, with my hand on the collective, I struggled to lean out far enough to see the load. Since I’m not a high-time long line pilot to begin with, I made the conservative call to forgo the 400-lb. load for this round and practice with just the remote hook. That was fine, but certainly less comfortable than flying from the left seat.
Granted, having Tompkins in the left seat of the aircraft shifted our lateral center of gravity left by about an inch, so the difference would probably be less pronounced for a solo pilot. But I’m not alone in my preference. Robinson initially planned on offering a less expensive “basic” cargo hook kit for right-side-only operations, but scrapped that idea after flight testing. Instead, R66 operators who only want to long-line from the right side will need to order their kit from Onboard Systems.
Utility helicopter operators are not famous for prioritizing the comfort of their pilots, so the more economical Onboard Systems kit (which retails for around $13,000) will no doubt continue to sell. Moreover, the factory cargo hook kit is currently only available for new helicopters, not for retrofit, which will further limit its market share.

But for full-time utility operators who are investing in a new aircraft, the Robinson cargo hook kit should quickly pay for itself through its advantages in performance, comfort, and safety.
Enhanced glass
While I was in Torrance, I also took the opportunity to check out the new Garmin touchscreen avionics for the R66 in a customer aircraft that was about to be delivered. My guide for this demo flight was flight test engineer Dale Taft, Robinson’s resident avionics guru.
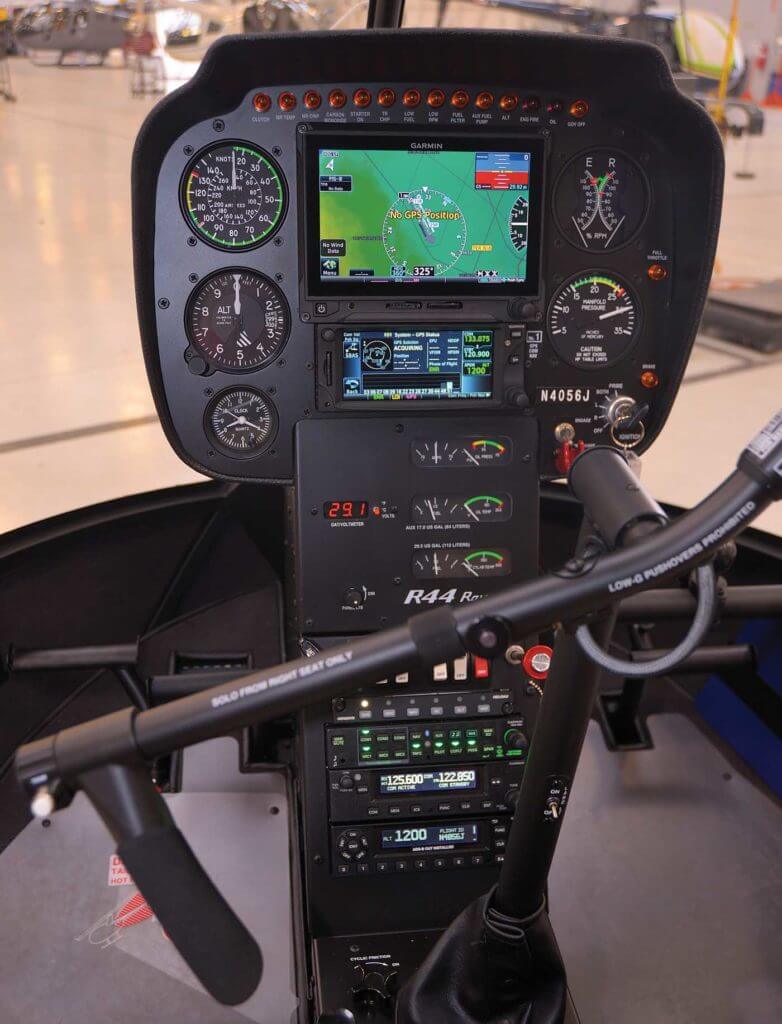
The Garmin Display Unit (GDU) 1060 Txi is a high-resolution, 10.6-inch touchscreen display that upgrades Garmin’s popular G500H flight deck. In the R66 I flew, it was paired with a Garmin GTN 750 GPS/nav/comm unit, plus a Genesys HeliSAS.
Also available is a smaller, seven-inch GDU 700L Txi display that pairs with any Garmin GTN 6xx model in a compact console. This landscape-oriented display was designed specifically for Robinson with the R44 in mind, but it can also be ordered for the R66. (The prices for the 1060 Txi and 700 Txi are $35,700 and $24,000 respectively, not including the cost of a requisite GTN 6xx/7xx.)
Taft and I started our flight over a grassy area adjacent to Robinson’s ramp, where I spent some time getting comfortable with the HeliSAS. We then departed west to intercept the coast, and headed south to give me some practice with the autopilot’s upper levels — all fairly straightforward.
West of Long Beach, we took a brief detour to fly toward a mountainside to demonstrate the terrain alerting feature, which provided clear visual and aural warnings as we got closer to the terrain. The sensitivity of this feature can be adjusted, and it can also be turned off for continuous low-level operations. However, doing so is not exactly simple or intuitive, so this would probably be a good checklist item for the ground.
I didn’t have any trouble with the touchscreen functionality of the system, although admittedly we were flying in smooth air. One thing I really loved about the display was the vertical speed indicator (VSI), which was custom-developed with Robinson’s input. Presented as a partial semicircle, it has a moving needle that quickly conveys trend — just like on a conventional analog gauge, only more compact.

We wrapped up our short demo flight with a practice ILS approach to runway 29R in Torrance. Taft showed me how to pull up the appropriate instrument approach chart on the 1060 Txi display, a fantastic functionality that is probably overkill for a visual flight rules helicopter, but which would make for a terrific instrument trainer.
With the approach programmed and altitude and heading modes engaged, we flew toward our final approach course; once we were close, selecting the NAV button on the autopilot intercepted the localizer. Likewise, pressing VRT at the appropriate point intercepted the glideslope, leaving me with nothing to do but set the power with collective. Watching the HeliSAS “stir the cyclic” as we descended on the approach made me a little uneasy, but Taft explained that it was normal. As he put it, the HeliSAS flies a great approach, “you just have to get used to the fact that it flies differently than you do.”
Although I didn’t find the size of the instrument console to be problematic on this short flight, there’s no denying that it occupies a lot of real estate. And much of that real estate is taken up by redundant analog gauges that have been eliminated on more elegant glass cockpit installations.
I don’t disagree with Robinson’s approach, however. Like I mentioned, primacy is everything. Many of Robinson’s customers were, like me, trained on analog gauges and default to those displays under stress; particularly for the private market, it makes sense to give pilots what they know and feel comfortable with, even while providing them with new functionalities.
I doubt you’ll be seeing the GDU 1060 Txi and cargo hook kit on the same ship, but both are great examples of how Robinson continues to develop its products with customers’ needs front of mind.
Not to forget that Dart Aerospace also have an STC’d primary cargo hook and provisions kit for R66.
I noticed $340 for a 6″ mirror?